Cheers guys i'm facing this mod soon and a good walk through was just what was needed. Some pics along the way would be the icing on the cake
On a side note does anyone else have a problem printing the SD workshop repair manual? I know its protected but i'm struggling to find a work around other than taking screen shots.

smoky
2009-03-11 13:09:00 UTC
Post missing.

Colonel_Klinck
2009-03-11 15:43:00 UTC
Post missing.

Motohooligan
2009-03-11 17:47:00 UTC
Colonel_Klinck
2009-03-11 18:59:00 UTC
Post missing.

Zenbiker
2009-03-11 19:19:00 UTC
Post missing.

CrotchRocketeer
2009-03-11 21:57:00 UTC
Post missing.
CrotchRocketeer
2009-03-11 22:34:00 UTC
Post missing.
Motohooligan
2009-03-15 19:46:00 UTC
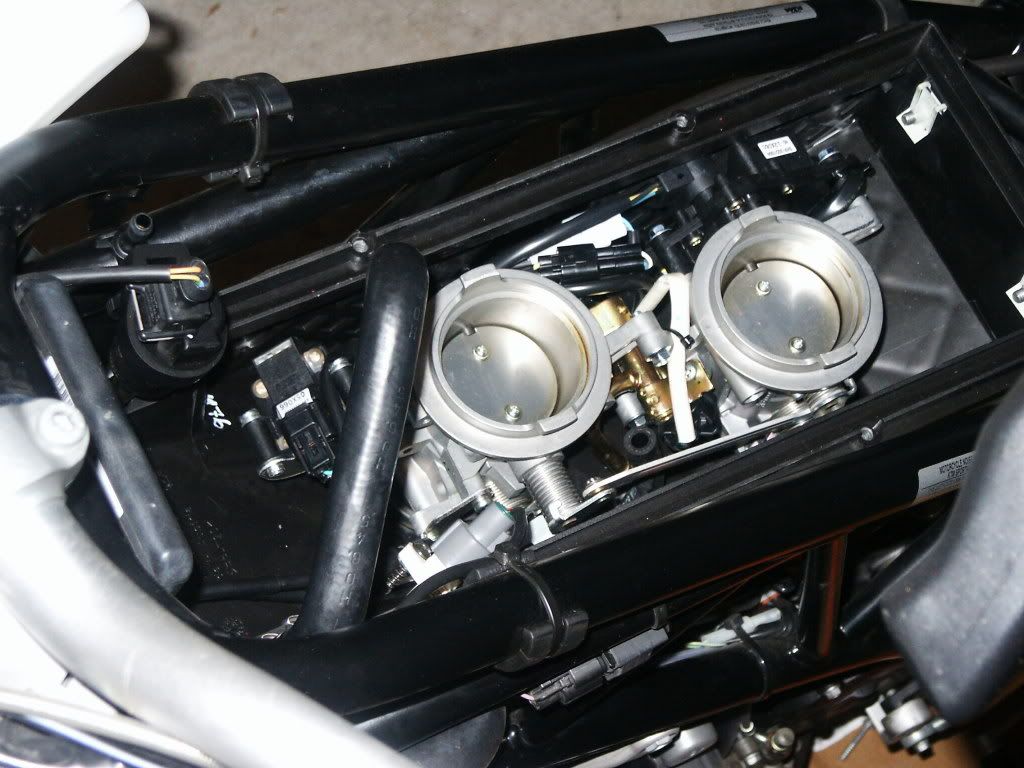
Props to Smoky. I got through it all up to installing the airbox and was trying to figure out what held the airbox into place. I forgot about the velocity stacks . I knew I'd find the answer here.
Now, to load Joe's map and pull the db killers
Now, to load Joe's map and pull the db killers
CrotchRocketeer
2009-03-20 01:48:00 UTC
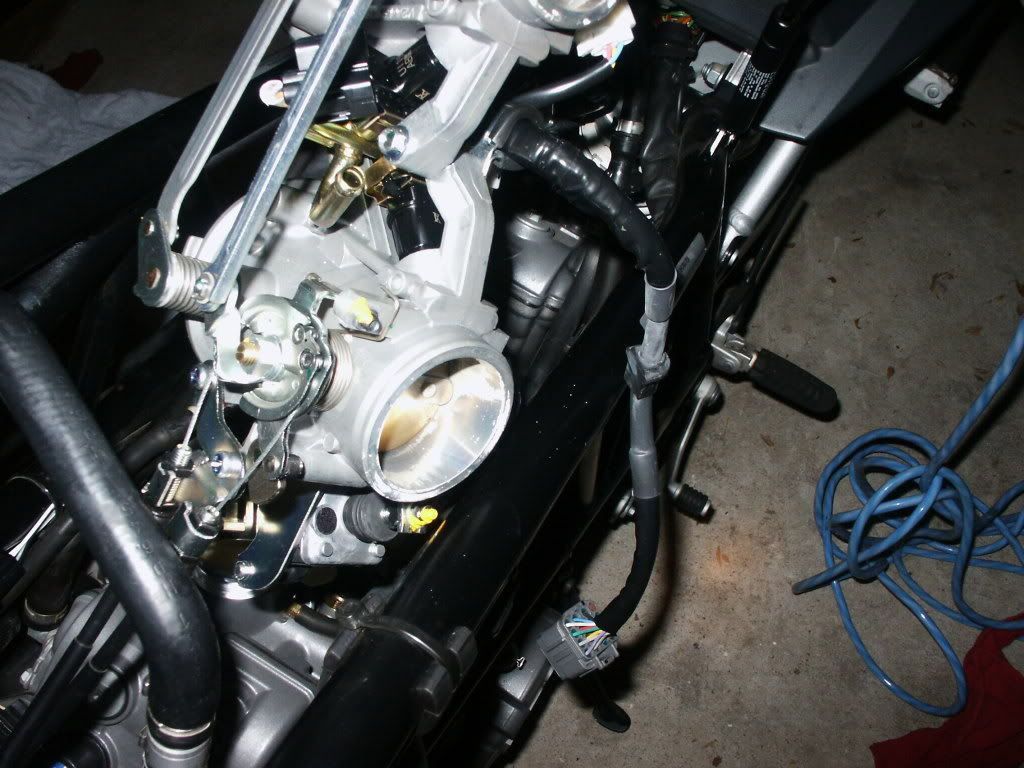
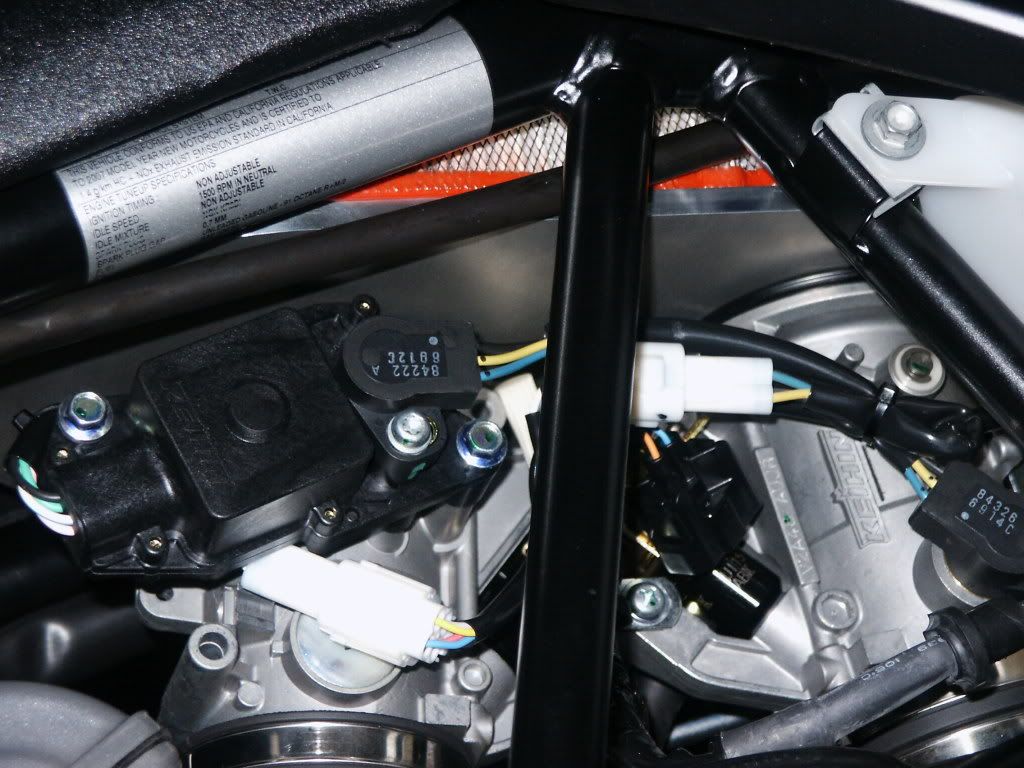
Ok, Is this the TB plug to undo? if so how do you unplug it?
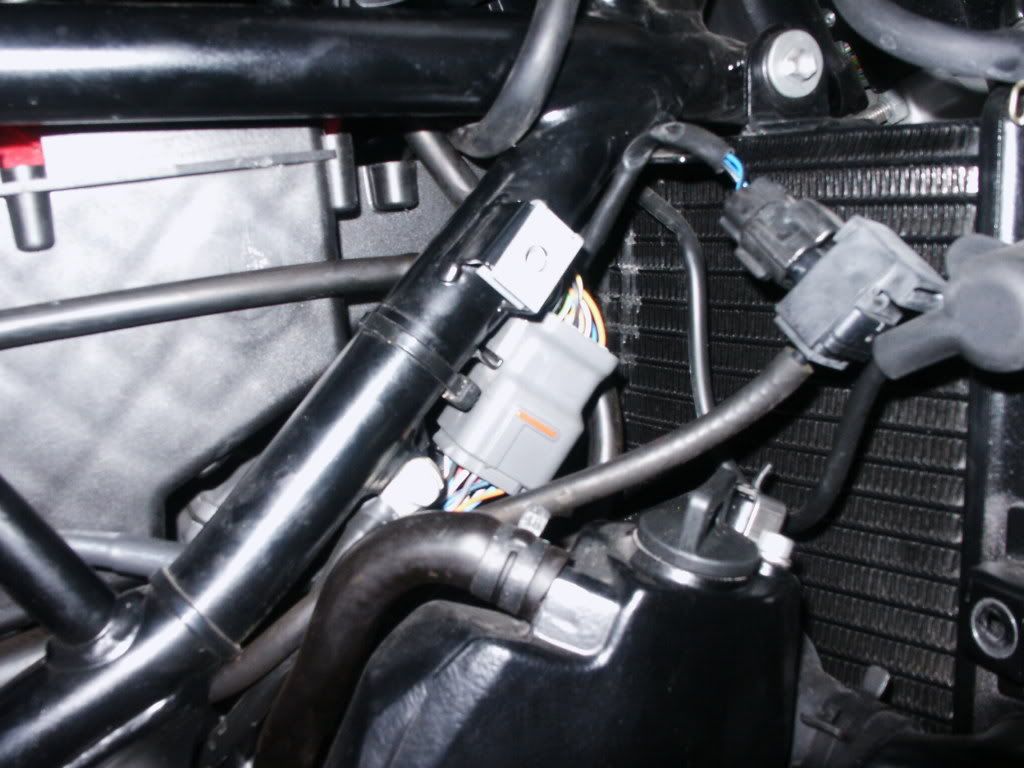
And I assume you lossen the lower set of screws here:
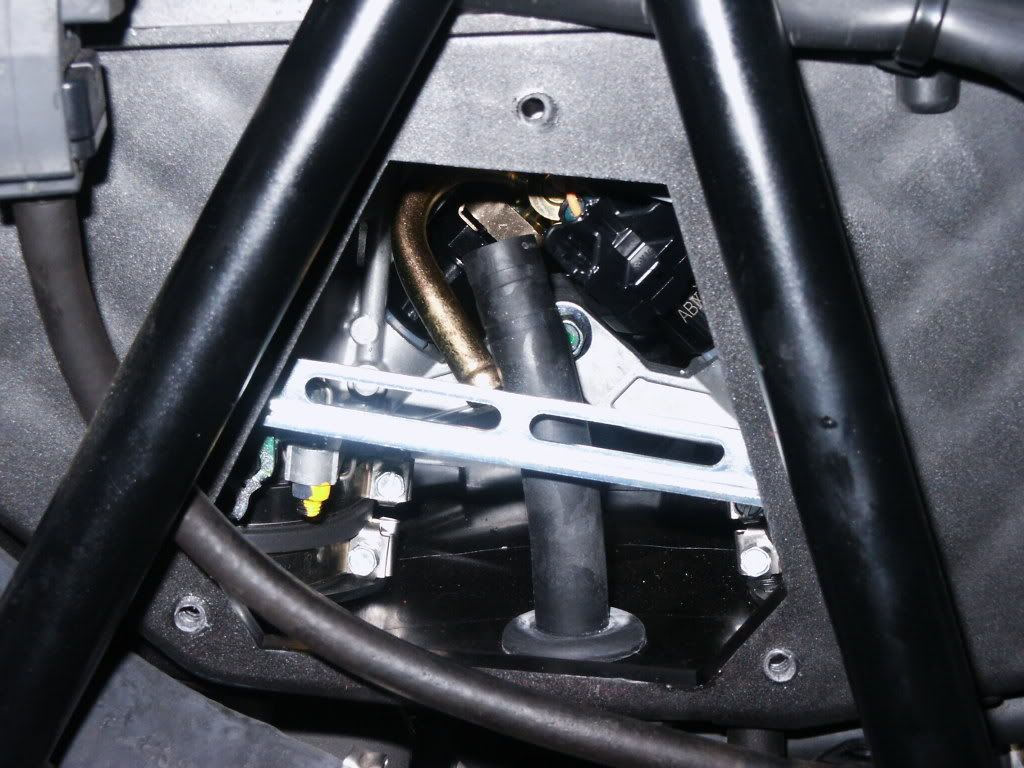
I am at the the turning point on doing this mod, half of me wants to put it back together and be happy, the other part wants to continue. The other problem I can see is how in the *** do I get to the front SAS plate?
And I assume you lossen the lower set of screws here:
I am at the the turning point on doing this mod, half of me wants to put it back together and be happy, the other part wants to continue. The other problem I can see is how in the *** do I get to the front SAS plate?
Zenbiker
2009-03-20 02:35:00 UTC
Ok, the Tb's are off, there is no going back now. The only thing stopping me is the stupid TB plug. I cant get it off the frame or my hand behind it to pull the plug. Someone tell me how to pull the TB plug please!!!

Lowrance
2009-03-20 02:41:00 UTC
Dont give up now, we can walk you thru this
First you need to go ahead and pop the TB's from the heads. Then remove the airbox from the gromets on the heads. This will alow you to move the airbox back a ways to alow better accses to the to the plug. once you can get to the plug hold the plastic locktab down with your thumb and use a large flat blade swrew dirver to seprate the conector. Use a twisting motion between the outer female part and the locking tab.
EDIT... I see you removed the coolant tank you should be able to pull the conecter off the frame tab and seperate the conecter now.
Like so.....
CrotchRocketeer
2009-03-20 05:16:00 UTC


Ok, I finally got that demon tb plug off by prying with my biggest screwdriver, at that point I didn't care if it slipped off or broke the tab holding it to the frame. It finally popped off. I unhooked it, then had problems getting the lower airbox out because of the SAS valve still connected and a hose that was latched to the bottom of the air box. Joe's suggestion of suspending the TB's is great unless you have someone to help you. I looped an electrical cord over my garage door track. Now to get to that front SAS? If I am lucky I will have this beast running again this weekend. I was suprised how easy the TB's came off, I was expecting a fight, but once loosened a slight side to side rocking had them out with no effort.
Lowrance
2009-03-20 12:13:00 UTC
Post missing.
smoky
2009-03-20 13:24:00 UTC
It can be done without removing anything with the right bit if kit, a chrome 8mm 1/4" flex (universal) socket with a 4-6" extension,
I have done mine and it took some coaxing, Plipton had also done his front SAS plate without removing anything,
the trick is going back in, you must be careful not to cross thread the bolt. I used an end wrench to start it and finished with the socket.
I have done mine and it took some coaxing, Plipton had also done his front SAS plate without removing anything,
the trick is going back in, you must be careful not to cross thread the bolt. I used an end wrench to start it and finished with the socket.
Motohooligan
2009-03-20 14:20:00 UTC
Looks like you're making progress there Crotch. The front SAS plate is a complete bitch! I didn't drain coolant either but I did loosen the oil tank and radiator to push them out of the way. If you've got big hands like me you're in for a bit of a challenge but it is doable. Just be patient and persistent, you'll get it. If not I'm sure Joe will hop on a plane and give you a hand . (he's closer than I am).
Keep at it, keep us posted and we'll help you through any issues that arise.
Looks like you're having a bit of fun down there on the beach in Galveston (you're avatar).
John
Keep at it, keep us posted and we'll help you through any issues that arise.
Looks like you're having a bit of fun down there on the beach in Galveston (you're avatar).
John
Motohooligan
2009-03-21 02:51:00 UTC
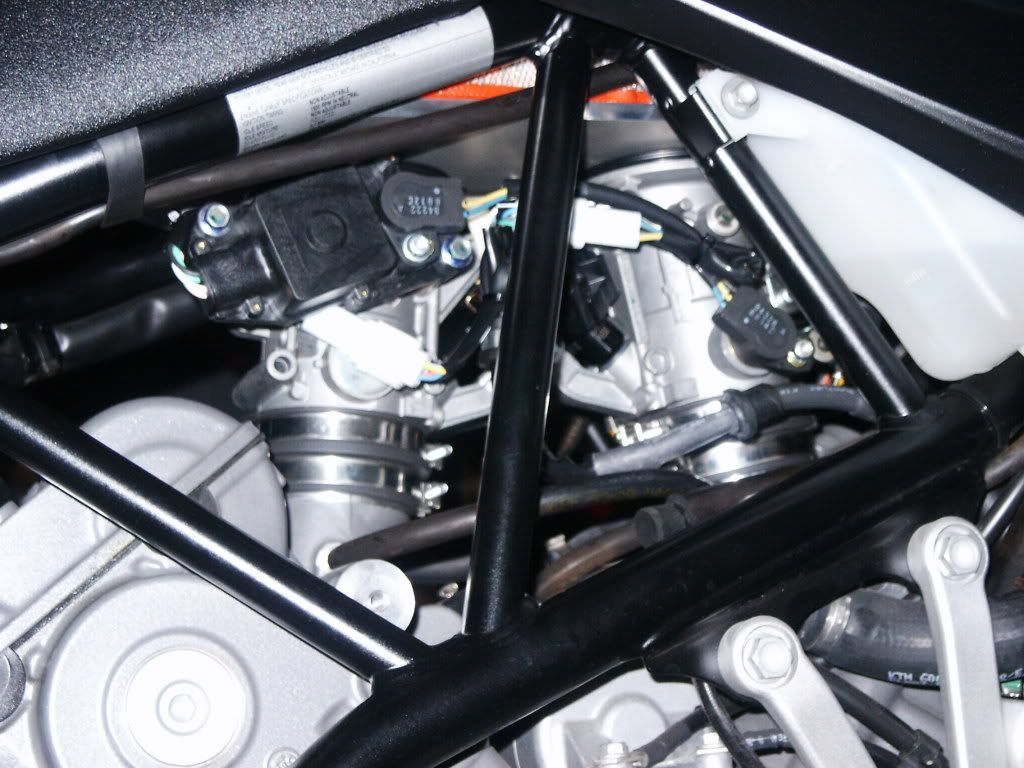
Ok I found the front SAS, it helps now that I am looking on the right side of the bike for it:
Still looks like a b*tch though. If I just loosen the oil tank/radiators on both sides I should be able to move it a little?
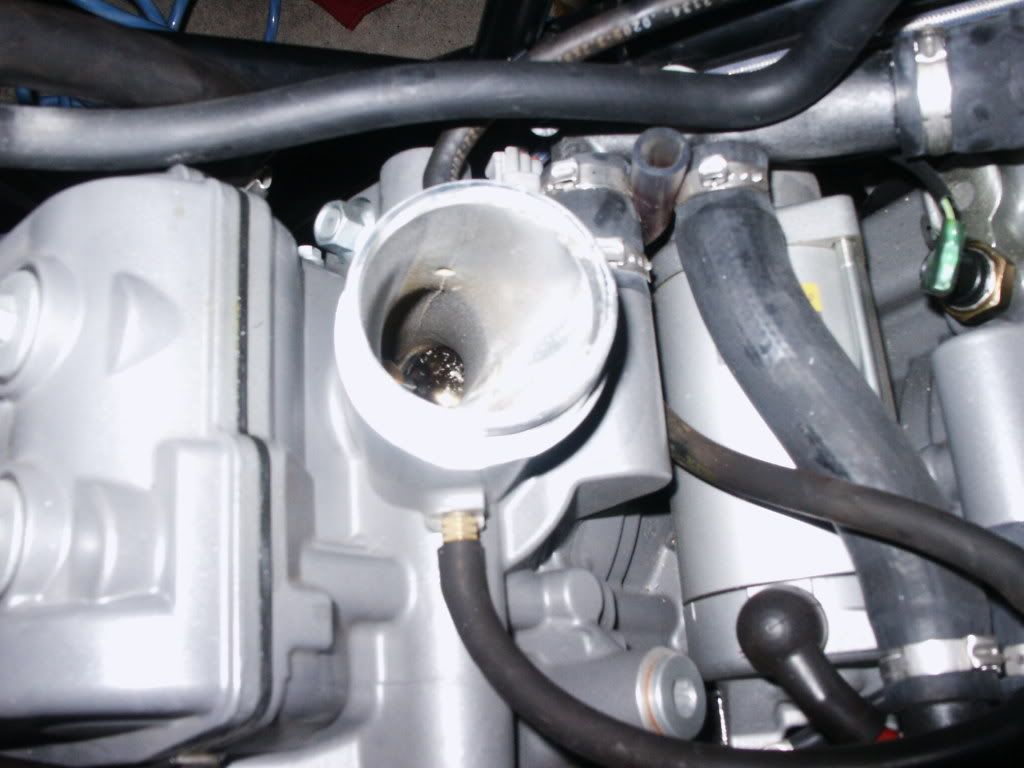
Meantime I found some nasty looking flecks on my intake valves, looks like the same stuff thats on the carbs: What is this calcium deposits or something. I'm like Kevin Harvick, I hate engine gunk!!!
I think I will try to vacuum it out.
Still looks like a b*tch though. If I just loosen the oil tank/radiators on both sides I should be able to move it a little?
Meantime I found some nasty looking flecks on my intake valves, looks like the same stuff thats on the carbs: What is this calcium deposits or something. I'm like Kevin Harvick, I hate engine gunk!!!
I think I will try to vacuum it out.
smoky
2009-03-21 12:58:00 UTC
Don't know what the white flakes are, didn't see anything like that when I did mine. It looks as if it might be paper towel debris. I noticed in an earlier post you had stuffed paper towels into TB openings in the heads (good idea by the way, don't want anything falling down in there!). If there was some dried up milk, paint, etc. that would explain it. It's ok to admit if if that's what happend. I just admitted to drilling a hole into my $150 Yuasa
That clear hose that runs down the side of your motor by the clutch slave cylinder needs to be removed.
When you button this thing up you need to make sure your hoses aren't flailing around. Zip-ty the vaccuum hoses to the wiring loom on the right and your fuel line on the left. I used a nice Mil-Spec hose clamp with a flange to mount my fuel line to an existing threaded hole.
John
smoky
2009-03-27 19:54:00 UTC
Post missing.
Colonel_Klinck
2009-03-27 20:06:00 UTC
Post missing.
CrotchRocketeer
2009-03-27 23:30:00 UTC
Post missing.

Orangutan
2009-03-31 04:06:00 UTC
Ok finally, got it back together. It was a massive fight, not with the box intstallation, getting the stupid f@*cking tank back down took 2 days of fighting, pulling, shoving, tugging, filing, tried every thing I could think of, including ratchet straps to the frame and cursing at the top of my lungs. I will never, ever, as long as I own this bike lift that f@cking piece of sh@t tank again. MotoH, I hope that filter is lifetime rated! I think the top screw is cross threaded now anyway, and I had to leave out the lower rubber bumper to get it at the right angle to cross thread it in there. I will pay a dealer $200 to do it, let them fight with this piece of crap. KTM made some crappy engineering decisions here, it is not good to have structural members under large amounts of stress/strain in their intsalled position, much less ones made of freaking plastic and containing flammables .
This mod is a piece of cake, as long as you know how to put your tank up and down. Maybe the 06' models are easier, I don't know, but I would not reccomend lifting the tank of an 07/08 SD to my worst enemy. That being said if you can and have lifted and closed your lid, this mod will be easy for you to do.
As far as rain\ water is concerned, it appears the mod does expose electrical connectors and throttle mechanisms that KTM obviously made painstaking design decisions to keep water shielded from. I don't ride through rain on purpose (unless I need my bike and myself washed!), so to me it is not a big issue. If you live somewhere where it rains all the time, or especially somewhere cold where they salt the roads and stuff, the exposure to the elements might mean you have to replace some TB related wiring and mechanisms more often, given you plan to keep your bike a long time. I would keep that in mind.
I'll post my opinions of the power gains in another thread, after I've ridden it a few times. My shoulder socket sensors do seem to be under some more stress than usual, and the bike now rev's from 4000 to 9500 so fast I have a hard time getting my mind around it..
Motohooligan
2009-03-31 13:49:00 UTC
Hello Crotch, joe would like to welcome you to the realm of "feckintankisum" I am an old shoe, had many bikes for more than 40 years now...
Agreed on the tank, my tank has been up a minumum of say 20+ times for various reasons. It is no doubt a real PITA.
To totally avoid the situation is as easy as removing the tank from the bike in it's totality.(to start with). Now please allow me to tell you all a short story...
this is about me working at the dealership on jap cars and how.... when the situation arose between 10 line technicians everyone in the know would
come to me with the dreaded cross thread or near it, I have became an expert in the field of threads and the successful starting of said threads,
so I would say that joe is a veteran of threads, I know them well and here is why... In the beginning...I had attended a state sponsored machinist school curriculum,
I was at the top of my class and became a tool and die grinder in a large machine shop. I can generally take most any bolt over to my bench
grinder/vise/fine thread file and change the first thread to a greater cutting edge so it becomes a "self starting" type of thread. I also understand
that after the rear pivot rubber bushing/nuts become off center that the bolt trick will not help..
Moto has made a special bolt that addresses this issue, these bolts are for us to use and he ..... may distribute them accordingly? so please be nice to MOTO!
As for the electrical connectors, these are all-weather connections and will not be affected by the weather, same as the air filter, look inside of one of them,
they all have rubber seals to be water resistant and imo pose little threat of water and dust in this area, we have frequent torrential downpours here in OK.
I will get many chances to test and report on these issues. the stock air box design is for volume, noise restrictions and trapping loads of engine heat.
this is the self destruct mechanism that is built into the bike sos they can sell you a new one pronto rather than lato.

fridayman
2009-03-31 21:09:00 UTC
The Motohooligan airbox?
Colonel_Klinck
2009-03-31 23:30:00 UTC
Post missing.
fridayman
2009-04-01 01:49:00 UTC
Post missing.
Motohooligan
2009-04-04 18:29:00 UTC
Post missing.
fridayman
2009-04-04 18:57:00 UTC
Post missing.
fridayman
2009-04-05 06:40:00 UTC
Post missing.

FITCH
2009-04-05 14:51:00 UTC
Hello Friman, Any alteration/modification should be promptly followed by a ECU reset, it is as easy as described. We have had some conflicts of opinion pertaining to whether or not the battery ground should be disconnected first or not, either way I know for a fact that it works for the benefit of the running of the SD to do the ECU reset.
With a cool engine, start the engine and let it come up to normal operation temperature "without touching the throttle" at anytime. (I personally allow the cooling fan to come on then shut off). Then shut the engine off, the ECU has now been reset. some say to allow the engine to run for 15 min's but because of differences in ambient temps I just allow the fan to cycle.
With a cool engine, start the engine and let it come up to normal operation temperature "without touching the throttle" at anytime. (I personally allow the cooling fan to come on then shut off). Then shut the engine off, the ECU has now been reset. some say to allow the engine to run for 15 min's but because of differences in ambient temps I just allow the fan to cycle.
FITCH
2009-04-05 16:11:00 UTC
Post missing.
CrotchRocketeer
2009-04-06 06:49:00 UTC
Post missing.

dade
2009-04-06 06:59:00 UTC
Post missing.
Motohooligan
2009-04-07 18:58:00 UTC
Post missing.
dade
2009-04-07 19:26:00 UTC
Post missing.
FITCH
2009-04-08 20:29:00 UTC
Post missing.
CrotchRocketeer
2009-05-08 04:07:00 UTC
Hey Simon,
No this mod does not affect the rev limiter, which kicks in @ 9500 RPM, it disconnects the wires that tell the bikes ECU that it is in 2nd and 3rd gear, which are limited to 80% maximum throttle no matter how hard you twist to comply with EURO 3 acoustic rules. Once the wires are disconnected you get 100% throttle in all gears, and you don't have to cut them, you can pull them out of the connector and tape them up so they don't short out. Just remove the 2 wires shown, the other wire is the neutral light which you still want.
No this mod does not affect the rev limiter, which kicks in @ 9500 RPM, it disconnects the wires that tell the bikes ECU that it is in 2nd and 3rd gear, which are limited to 80% maximum throttle no matter how hard you twist to comply with EURO 3 acoustic rules. Once the wires are disconnected you get 100% throttle in all gears, and you don't have to cut them, you can pull them out of the connector and tape them up so they don't short out. Just remove the 2 wires shown, the other wire is the neutral light which you still want.

welladjusted
2009-05-27 05:33:00 UTC
Post missing.

ktmguy
2012-05-16 13:37:00 UTC
can anyone tell me where you get those pliers from which have been using in the picture above to remove the big grey connector? (can't see to find them anywhere)

DGShannon
2012-05-17 01:13:00 UTC
Post missing.
DGShannon
2012-05-17 13:44:00 UTC
ta, explains where i was going wrong. Doing it from the side is too darn fiddley. Shall give that a blast.

Bert
2012-06-02 21:22:00 UTC
Ordered mine up, last week. Arrived yesterday, and I had to immediately tear into the box! REALLY impressed with the quality, fit & finish. First thing this morning, it was out to the garage. Downloaded the pdf manual, from the MotoHooligan website, and just walked through it step by step. First hiccup was that the directions said the you "might" want to remove the snorkel, in order to better get to the air sensor screws. Got to my screws easy, so didn't remove the snorkel. Work along till I get to the step on removing the lower portion of the airbox. Hmmm... Throttle cables appear to pass through a closed window, in the front of the airbox. Wonder how you get those out?
Finally, lightbulb goes off, remove the snorkel, and presto. Next big pain was the front cylinder SAS plate. Royal pain to get the bottom screw out, and equally painful to get it back in, with the new plate in place. Forum was helpful here, in that I had already read about this issue, and the patience needed to keep fiddling with it. All the dookie stripped off (SAS, charcoal canister, assorted hoses), vacuum caps on the throttle body bases to block off the spots where the canister hoses fed back in. Removed the secondary butterfly plates (shafts still in place). Tidy everything up, install the MotoBox stuff (all fit excellent), dielectric grease in the Big Gray Connector, reassemble everything, tank back on, etc. The front tank bolt was a bit of a pain, but forum to the rescue again! I had already read about using a large screwdriver, to pry between the steering head yoke and the front of the tank. Squint, hold you tongue just right, a few appropriate words, and the bolt went in. Maybe 10 minutes of fussing with it.
Moment of truth. Thumb the starter button, and she roars to life. A couple of hiccups in the first few seconds, and then settles down to a smooth idle. Let it warm up, a couple of throttle blips, and you know already that something is different. The bike has always had immediate throttle response, but now it seems even quicker! Cannot wait till it cools down outside (currently in the low 90's F) so I can take it for a ride.
Thanks to everyone here, for all the postings on the airbox, assembly steps, tricks, etc. What initially felt like a bit of a daunting task, was easy. Great Saturday morning diddling with my bike, and hopefully (fingers crossed) improving it. It already had FMF carbon canisters, and the Akro map. Ran pretty good, but was a bit snatchy down low, at times. Seemed to sort of come and go. Hoping the airbox, and butterfly removal, smooths things out a bit.
While at the dealer, I talked to the dyno guy to get some feedback on his experience, and specifically his experience tuning SuperDukes. Turns out, he had never done a SD. Right off the bat, he tells me that I can't even change the map, without a PowerCommander installed on the bike! So, forums to the rescue once again, as I had already read tons of TuneECU, TuneBoy, the USB cable, etc. Even with my limited forum knowledge, it was enough to guide me to just walk away. This was not the guy to be touching my bike. The MotoHooligan website indicates that the Akra map is a safe start, with the airbox. Really hoping that it runs pretty decent, with the current map. So, I at least feel safe riding it (not to lean, etc.) until I can find the right place, and person, to map the bike.
Again, I want to thank all you guys for the forum, and your input. It was critical to swaying me toward the SuperDuke, and to start playing with the mods.

Mr_Trecolareco
2012-06-03 14:22:00 UTC
Post missing.

41KS
2012-09-16 18:52:00 UTC
Well I also ordered the motohoolgan airbox for my SD I have acro ti sysem on it now . back to the air box, I read on one of the posts that replacing the intake stacks with RC8 stack work good too so I ordered them also (cheap) is that a good way to go? I'm also thinking of just putting the hooligan oval flies on.and not removing them altogether. any other comments one that. ?
Mr_Trecolareco
2012-09-16 19:00:00 UTC
Post missing.

Stratkat
2012-09-17 01:20:00 UTC
Thanks for the reply. Is it worth doing ? What advantages will I get by removing the flies and shaft any negative?

AGRO!
2012-09-17 11:18:00 UTC
Well I got my SD back from the shop this saturday for the big service and installed the motobox, removed the flies, 39 tooth sprocket, akrapovic map ( still needs to go to the dyno and mapping it maybe next week ) and rc8 inlets and boyyyyy what a difference.
When I changed to the akrapovic slip ons with the smoothed map shared, it was much better.
But now I ended up thinking about a quick throttle how smooth and strong the bike pulls.
Before 40/50 km/h was still in 1st gear to avoid the bumps with the engine, now I can ride in 6th from 60/70km/h.
Even without the tune already paid off

KTM666
2012-09-17 12:32:00 UTC
Post missing.