Superdan
2010-03-19 12:24:00 UTC
Right turns out had the wrong GSXR springs just received the correct ones from Sigma today and hey presto, thanks to BigAsh and Ducati Pete for some tips along the way.
Here is a little how to if you fancy doing the same, should be equivilent on the STM slipper also but apparantly that needs more setting up.
The kit:
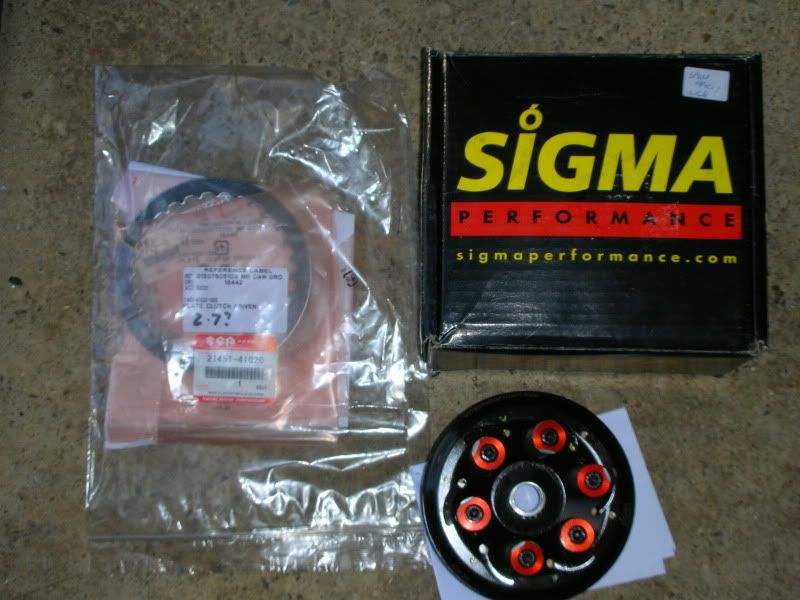
The amount of slip or engine barking you get is decided by the final metal KTM plate being changed for a GSXR one I tried the middle of the road 2.3mm I also have a 2.5mm so hopefully have equal engine brake to slip (I do like engine braking so may well change to the widest gixxer plate).
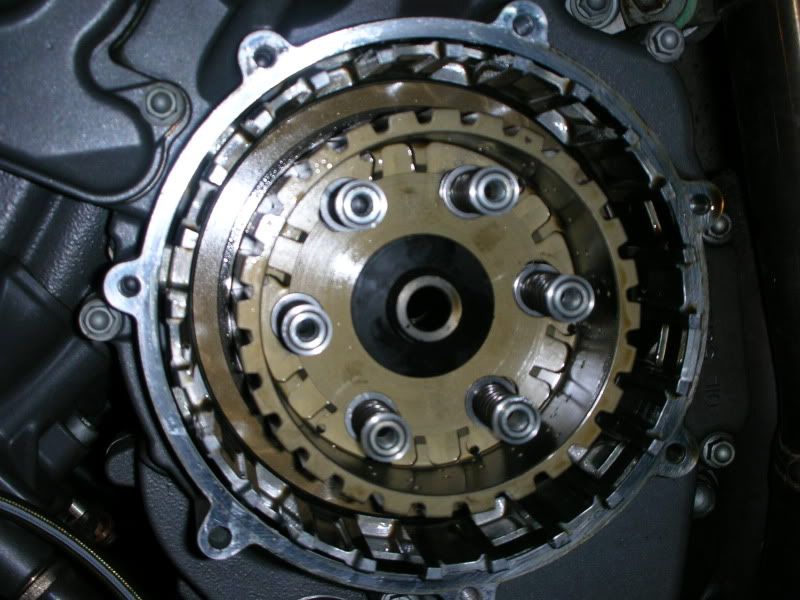
Place bike on side stand so when you take off clutch the oil does not all come out and remove clutch cover, should look like this:
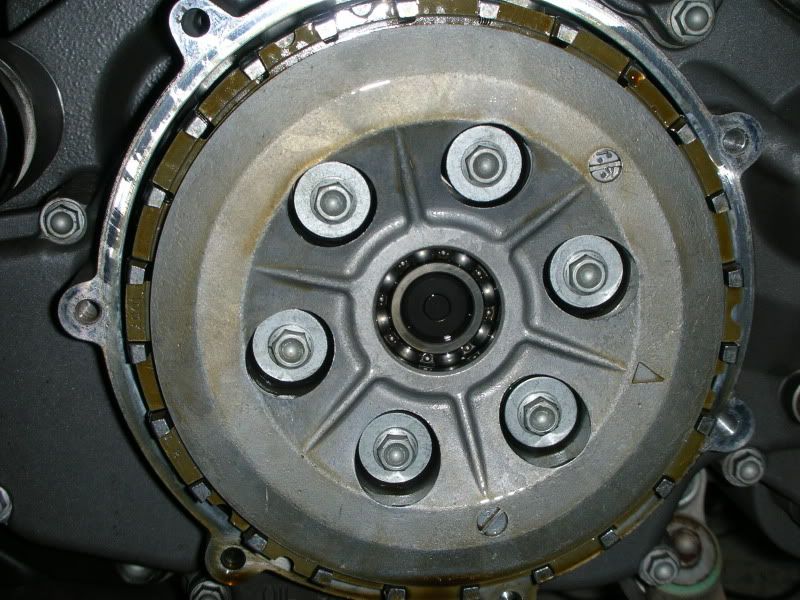
Then remove the 6 bolts and buckets and keep them safe you dont need them anymore, pull off the clutch hub and remove the plates (you can leave em in and take em off when you remove the 32mm nut), there are two small plates which I did not initially see as they were stuck to the clutch dont forget about those, and remember LOCTITE all the bolts!
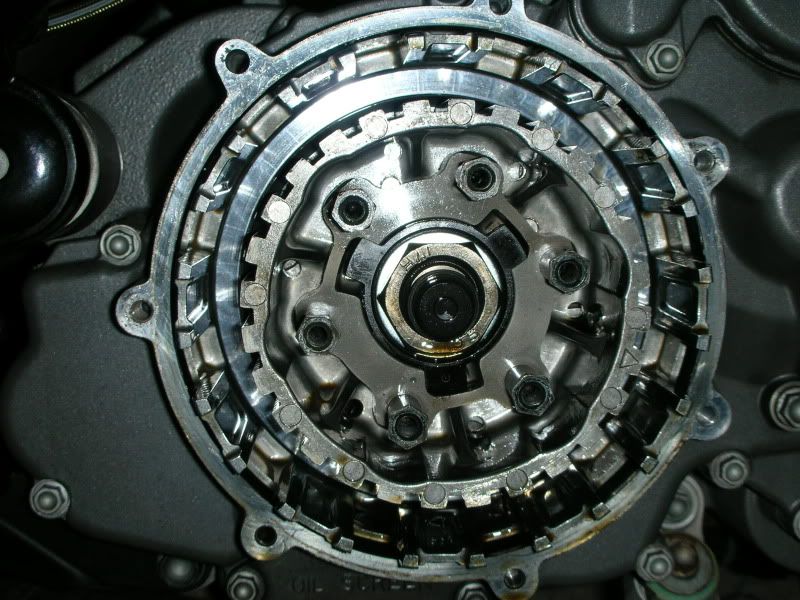
Thanks to BigAsh for this tip, buy an Impact wrench this runs off a 12v car battery awesome for the price
http://cgi.ebay.co.uk/ws/eBayISAPI.dll? ... 0523629042 (also excellent for doing front sprocket nut)
Whack it in 3rd gear or higher and bosh the 32mm nut comes off:
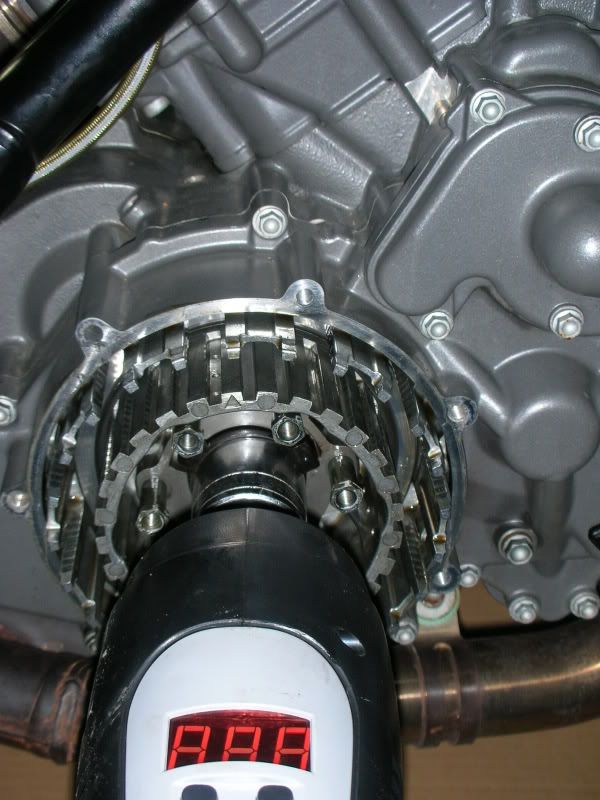
The clutch centre then comes out you need to replace with the sigma one and stick the bolt back on and torque it up (think was 120NM of top of head):
Then place the clutch plates back on in this order from looking at your clutch parts on the "engine spares" in your manual. You need to start with a No.8, then a No.7 steel disk, then 12, then 11 then the No.10 disk then rest of pack leaving the last KTM plate out and replacing with a Gixxer steel one (thicker), dont forget to lock the last plate into the clutch housing.
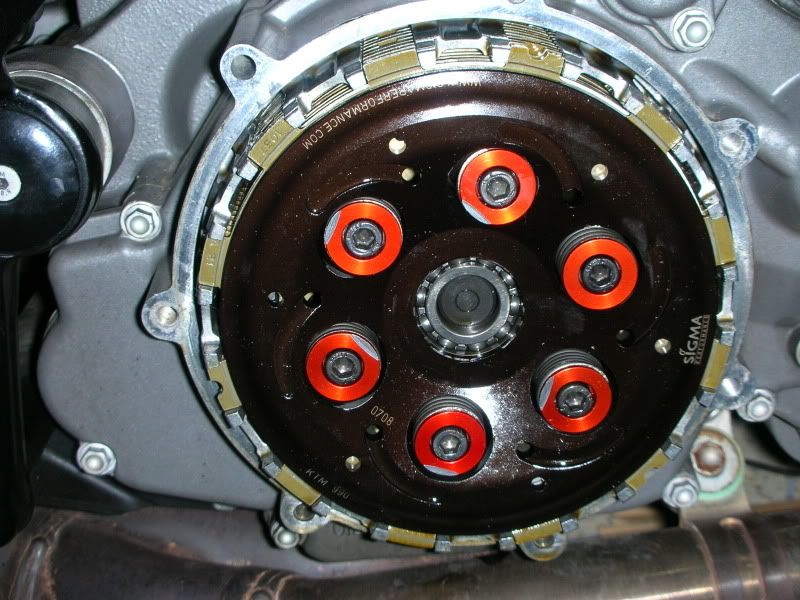
Finally remove the spacer from the inside of the clutch cover with the one bolt.
Jobs a good'un will let you know what its like in due course!
Twisted Jester
2010-03-19 12:29:00 UTC
Nice one, glad you got it sorted in the end.
Superdan
2010-03-19 12:34:00 UTC
Yeah in the end
Dont think the previous owner of said clutch had removed the spacer from the inside of the clutch cover hence the marks on the red buckets. Does not detract from its operational ability tho.
Bloody lovely day too wish I could go out and play, will do my oil change instead. Not quite as fun
BASH69
2010-03-19 18:45:00 UTC
Nice 1 dood - certainly was a luveleeeeeee day 2day, same here tho , didnt get out on the bike
The STM is quite abit diffrent TBH mate, it uses 2 large round springs rather than the 6 GSXR 1s which the sigma uses, if you eva get bored have a look at an STM diagram, its ermmmm, confusing
Viking
2012-02-22 16:09:00 UTC
Just fitted mine. All pretty straightforward.
Few things to add to this. When you take the old basket off there is a thick spacer/washer with a few small holes drilled in it, located at the back of the spline. You leave that on.
New basket goes on. New black tapered washer on, then big nut threadlocked and torqued up. Refit all clutch plates. Remember after the 1st one that goes on there is a big chamfered ring. Should all be in the workshop manual.
Measured the standard last plate and mine was the same size as the middle recommended GSXR one. Measured the clearance as per instructions and its set at 1.2mm. Instructions say anywhere between 1mm to 1.5mm is ok.
Clutch is biting ok and going into gears up and down driveway. Will give it a run as soon as the weather clears up. Might have to play with that 1.2mm figure to fine tune it. Just off the top of my head, 1mm will be tighter, 1.5mm will allow it to slip more. Is that right? So going up to a 2.9 plate will make it slip less???
Was pleasantly surprised when I took the plates out. I do like a wheelie or 5. But the plates were all nice and clean with hardly any wear. No blueing or marks on the steels either.
Superdan
2012-02-22 17:38:00 UTC
Good job dude
Viking
2012-02-22 17:53:00 UTC
Cheers for the info. Big help.
It's a bit misleading with the instructions saying not to use any standard washers. I built it up and it was on he biting point with the lever fully in at the bar. Had a look at it and fitted that washer and it all worked ok.
I've never rode a bike with a slipper. Really looking forward to it. Might have to calm down my auto blip right wrist.
Superdan
2012-02-22 17:55:00 UTC
Yeah took me a while to forget to blip.
Agree instructions were crap that you get, just thank yourself you never had to speak to Neil Spalding who runs Sigma (tech guy from motogp on Eurosport) what a cock he is
Ducati Pete
2012-02-26 18:17:00 UTC
Viking, the thicker the final plate the less slip you will get.
Viking
2012-02-26 18:26:00 UTC
Cheers dude. I'd looked into it over the last few days. Thicker pack + less slip.
With the marks on the spring collars............... I spoke to a mate with an R1 who said Sigmas are bad for winding out the posts those allen bolts thread into.
This might be whats happened to mine and Dan in the past to cause the marks???
I took off the disk from the inside of the casing. No idea what thats for? Maybe some kinda vibration damper or something?
Vortex155
2012-04-12 18:16:00 UTC
Very usefull topic this one, hope it helps gettin 'round fitting the sigma upon my rc8, so thx
good hint bout that impact wrench tool also.
Linga
2012-04-12 19:00:00 UTC
Post missing.
Superdan
2012-04-12 19:15:00 UTC
Should be removed as per instructions for sigma, will wear the bolts away. Not sure if its a damper as such (not quite sure) just thought it was there to keep push rod from pushing out too far.
Viking
2012-04-12 19:20:00 UTC
No mate it's all cool.
I'm increasing the gap on the pack from 1.2 to 1.5 for a little bit more slip though.
Razy
2012-04-12 19:45:00 UTC
I really need to get mine fitted. It's been sitting in the box for bloody ages.
SDNerd
2012-04-12 19:46:00 UTC
Post missing.
Linga
2012-04-12 20:08:00 UTC
I fitted an STM and it cleared without removing the damper so I left it in.
I might pull the case and have a look after it had a good run.
Old Ruben is awesome, my mate even named his kid after him
Viking
2012-04-12 20:19:00 UTC
It doesn't hit Linga. Clearance is ok.
The main threaded posts that the allen bolts screw into are supposed to be threadlocked. If not they can unwind a little bit and cause the collars to skim that disc/weight thing. Throw that disc away, It's extra weight anyway......gerrit oooouuuuttttt!
Vortex155
2012-04-19 18:28:00 UTC
At which plate did you place the judder springs or did you left them out?
Viking
2012-04-19 18:33:00 UTC
The Sigma doesn't have judder springs. Only springs it has are the 6x GSXR ones on the face plate.
I think it's the Suter that runs the more complex set up.
Ducati Pete
2012-04-21 00:16:00 UTC
Post missing.
Vortex155
2012-05-12 10:54:00 UTC
Hello I have serious problems with the installing of a TSS slipper clutch I bought recent for my RC8.
The slipper clutch is to tight to fit upon the clutch axis, is this normal.
With normal manpower without using hamers or bars, it just won't fit into place.
As I was pushing that TSS upon the axis i even managed to lift my bike, removing afterwards was also very stressy..it just won't let go.
So had to fabricate a special tool that fits the m6 holes to take it back off the clutch axis.
This bout the best position it grabs, so the washer still have to be in place and the center bolt can never be bolted upon that axis.

I managed to free it off the axis without damage and decided to let it go for a while.
So my question...is it normal that it doesn't fit 100%????
The oem clutch is a perfect fit and installing/removing doesn't give any issues.
So not normal imo?
Vortex155
2012-05-12 10:55:00 UTC

TSS slipper clutch KTM RC8
not fitting at all...
Linga
2012-05-12 12:02:00 UTC
It should slide on easy mate... You shouldn't have to bash it.
What does it look like with just the basket and what does the back of the slipper look like ?
drswade
2012-05-12 13:27:00 UTC
I don't know how they say that the Sigma is not the same as the Yoyodyne. They look exact to me.
I saw no mention in this thread of thin judder/Bellville spring at the back of the clutch.On the Yoyo they tell you to put it, as well as the plate with the larger I.D a few plates in instead of the standard clutch's way of putting them in first.
This keeps them from slipping under the clutch hub when it open up under slipping operation.
Did I miss this somewhere?
Millar
2012-05-13 06:24:00 UTC
Superdan mentions them in the build order, when you look at your parts manual from your handbook, they are listed as parts 11 and 12. They go in after a standard friction plate and steel.
Vortex155
2012-05-13 09:16:00 UTC
Post missing.
drswade
2012-05-13 14:48:00 UTC
I had extra plates so replacing the larger ID one makes perfect sense. I wish they would recommend that. I guess I got lucky with the spring!
Vortex155
2012-05-14 06:56:00 UTC
This are pix of that TSS I've got


And this is about as far i could manage to get it in...it ended up sitting struck and only could be released with a special tool i've made.

Must be something to do with the coating that rests inside the grooved axis hole,or just fabrication-tollerance fail?
TLS_Russ
2012-05-14 07:41:00 UTC
Post missing.
Vortex155
2012-05-14 12:54:00 UTC
Supplier doesn't understand what the problem is
send him a line, a week ago, keeps asking more details.
had to be sure, those slipper clutches are as easy to mount as the original.
Vortex155
2012-05-22 08:37:00 UTC
Have to send it back to TSS in Tjech on my own cost, good service....NOT
Thx
www.mojomoto.be for not helping me out on this one.
Lucky there's No I don't like on bleeding facebook
Vortex155
2012-05-23 12:52:00 UTC
Send it all back to Tjech republic, cost me 30€.
Great... hope I'll get a new one back and sure hope it fits this time.
CEREC1
2012-07-14 15:16:00 UTC
Help
Fitting my Sgma slipper now for tomorrow and I've just noticed all the little notches on the fibre plates don't seem to have a pattern of alignment.
Don't know how to line em up.
Anyone on line now able to help
Superdan
2012-07-14 17:10:00 UTC
I think from memory I placed them all in at a slightly different angle, first at 12 oclock next at 1 next at 2 and so on. I think its just the last plate that has to be in a certain way to lock it in.
CEREC1
2012-07-14 17:36:00 UTC
Post missing.
Superdan
2012-07-14 17:56:00 UTC
Post missing.
CEREC1
2012-07-14 18:47:00 UTC
Post missing.
smokedu
2012-08-27 03:09:00 UTC
Post missing.
No. 47
2013-05-06 12:28:00 UTC
Just stripped my Sigma 'cos it's started to drag when stopped and slip at high speed/hard acceleration - thought this might be due in part to flattened ball bearing in Oberon slave but replacing it has made no difference - clutch looks OK re tabs, plates, springs, 1.5mm centre/pressure plate clearance, etc but the basket can be rocked laterally slightly - checked nut and tight at 120Nm - also pressure plate holes for spring and bucket are oval, not circular, and pressure plate can be partially rotated as a result - suspect all this is wear and tear after race miles and 60k+ road miles and a call to Mr Spalding required - anyone have their Sigma visible/accessible at the moment and let me know if theirs is similar or not?
No. 47
2013-05-08 17:00:00 UTC
Bump..............
Superdan - do you have the Sigma fitting diagram and/or CD in .pdf format? I have a copy of the written instructions and the check procedure but no pictures or guide for the referenced parts.
Superdan
2013-05-08 17:19:00 UTC
Nope, had it on paper, I am fitting Tony The Tigers for him at the W/E, I may take some more pics as there is/was a little confusion as to the way its put back in from my post as its slightly different to stock, from memory the small plate goes in first than the two diagram type rings and then the stack.
The instructions were not that good was a bit of trial and error when I did it.
Tony the Tiger
2013-05-08 18:21:00 UTC
Post missing.
No. 47
2013-05-08 19:12:00 UTC
Thank you - pm sent.
Clutch has finally given up on me riding up my nemesis, Wrotham Hill, and travelled the last ten miles or so home at just over walking pace.
No. 47
2013-05-10 09:57:00 UTC
Judging from the photos sent thru' by Tony - thanks again - the pressure plate holes are oval/oversized as new but would appreciate your confirmation.
CEREC1
2013-05-10 10:02:00 UTC
Post missing.
No. 47
2013-05-10 11:45:00 UTC
I'm trying to establish whether my pressure plate is knackered or not.
No. 47
2013-05-12 12:49:00 UTC
Just stripped out the clutch - 10 steel plates (no. 7 on the parts fiche), 11 friction plates but all the same id (no. 8 on the parts fiche?) but some with slightly different friction pad pattern, no Belleville spring (no. 11 on the parts fiche) and no thrust washer (no. 12 on the parts fiche)..........................no idea why it's not been fitted as per Sigma instructions.
Can see from the parts fiche that friction plate no. 10 is a larger id than the no.8's but what's different about no.9?
Superdan
2013-05-12 13:56:00 UTC
Parts 11 and 12 should obviously be included?! part 11 gets stuck on the OEM clutch hub and you have to pry it away and can be missed, but missing off part 12, weird.
As for part 9 being different, its the same thickness 2.8mm but different part number, not sure if it has a different pattern.
(Below is parts fiche for reference)
http://shop.jimaimracing.co.uk/acatalog ... 05-06.html No. 47
2013-05-12 14:14:00 UTC
It's a Sigma I've just stripped out so 11 and 12 should've been mounted after a 7 and 8.
Has worked fine for 60k+ miles though so will be interesting to see if I have to fit the new clutch pack as per the old removed pack or if the correct installation still gives the required clutch centre/pressure plate tolerance (can't see how though unless the old clutch pack was running out of tolerance).
Unless I have an early version of the SDR Sigma...........
No. 47
2013-05-12 14:54:00 UTC
Superdan - just trawled back through the thread and have a couple of questions:
- the last clutch plate is a friction plate, not a steel plate, in the OE set-up - did you replace that or the last OE steel plate with a steel GXSR plate?
- what do you mean by 'locking' the last plate?
-to check clutch centre/pressure plate tolerance, measure between the top of clutch centre and top of of pressure plate through one or more of the holes in the pressure plate with no plates fitted, then same again with plates fitted - difference should be 1.5mm - is that right?
Superdan
2013-05-12 15:16:00 UTC
I did swap my last plate for a gsxr one because that's what instructions said, however Tonys instructions made no mention of the 3 different gsxr plates you could use so we left it as stock.
Say you put all the plates in at 12 o'clock for example, the last plate goes in at 2 oclock, however again Tonys instructions made no mention of this and pics showed all plates in line so that's what we did.
As for last Q I never measured anything
No. 47
2013-05-12 15:46:00 UTC
These are the instructions I have (refers to Suzuki plates but not re replacing last friction plate with steel plate...................):
Sigma Performance Slipper Clutch for KTM990
Thank you for choosing a quality Sigma Performance Competition part. The Centre of the clutch now has a ball and ramp mechanism. When the rear wheel wants to turn faster than the engine this lifts the centre of the clutch until it pushes the pressure plate off the clutch friction plate pack and allows it to slip. The thickness and condition of the clutch pack is critical to the correct operation of the clutch and should be checked regularly. The clutch may be damaged if acceptable tolerances are not maintained. For more information on slipper clutches and their set ups see the slipper clutch section of sigmaperformance.com
** This clutch is designed to work with 6 x Suzuki GSXR1000K5/6/7 clutch springs part # 21413-41G00. Not supplied **
A KTM mechanic should assemble the clutch as follows.
Read the instructions and look at the photos before you start.
a) Access the Clutch in accordance with the KTM Workshop manual.
b) Using KTM Workshop tools remove old clutch centre.
c) Carefully record the order in which the clutch comes apart.
d) Clean all Loctite from the threads of the gearbox shaft. Clean the threads on shaft and inside the BIG Main standard nut with brake cleaner. (A)
e) Install preassembled slipper clutch drum. Ensure the clutch is home on the shaft..(B)
f) Place the supplied washer over the clutch centre (C ) IMPORTANT, the large washer acts as a travel limiter for the clutch lift mechanism. It must be on the shaft immediately next to the clutch centre. Do not use the standard washers.
g) Loctite (Loctite No. 620) the STD main nut (D) onto the top of the assembly at the standard torque settings (127 Nm) (E) while holding the unit with a standard KTM Clutch holding tool .
h) Install the standard clutch plates in the basket in a different order to standard. (F) first install a normal friction surface small I/D friction plate, (G) then a steel plate. Then fit (H) the chatter rings and (I) then the large I/D ‘narrow friction surface’ plate. The rest of the plates are fitted exactly as they came apart (J).
i) Install original clutch pushrod spacer to pressure plate and mount it to clutch drum (K) . Use 6 x Suzuki GSXR1000K5/6/7 springs (L) with the Kit buckets, tighten to 8-10 Nm (M,N)
j) Check correct clearance between the top of the clutch centre and the pressure plate using the hole in pressure plate. Correct clearance is around 1.5 mm. If you need to adjust the pack thickness the following standard steel plates are available from Suzuki. 21451-41G10-000 2.0mm thick, 21451-41G00-000 2.3mm thick, 21451-41G20-000 2.6mm thick.
k) For more information please see the separate instructions on the attached CD.
l) Remove the aluminium spacer from the inside of the clutch cover (O,P)
m) Using new gasket refit Clutch cover according to KTM workshop manual.
LIST OF PARTS
1 pc. Clutch drum preassembled
1 pc. Large washer
1 pc. Pressure plate
6 pcs. Spring buckets
6 pcs. Bolt M6
This is a competition accessory; for track or extreme use we recommend the clutch be stripped and the plate pack measured and inspected regularly.
Sigma Performance Limited Reg. No 3690135
Registered Office. Hanover House 18 Mount Ephraim Road Tunbridge Wells Kent TN1 1ED
and have just found this re checking clearance (refers to rotating metal plates but it's only the friction plates that have notched tabs):
Sigma Slipper Clutch, clearance checking and adjustment.
Clearance.
This procedure is recommended to ensure your clutch is set up correctly. If you use a new standard clutch pack on a clutch assembled correctly on to the bike then you should be able to use the clutch immediately with no additional work necessary to set it up for correct operation.
If you hold the pressure plate up to the light you will see that there are several holes through it that are not required either for the springs or the clutch centre. They are the furthest out from the centre. These holes are clearance checking holes. If you turn the pressure plate over and look at the pressure plate from the ‘back’ you will see they all come out in the groove that takes the clutch centre when the clutch is assembled. We use these holes, together with a depth gauge, to measure how far the centre has to rise when the slipper mechanism is activated.
All clutch metal plates have small notches cut in them. These deliberately destabilize the balance of the clutch plates and help the clutch pack ‘break’ when the lever is pulled in. On assembly make sure the notches are distributed randomly.
This procedure is normally done with the clutch on the bike but if you wish can be done off the bike (our pictures are of a clutch off the bike only for clarity).
1) Before you fit any plates to the clutch, place the pressure plate on to the top of the clutch centre.
2) If you look through the clearance check holes you will see the top edge of the clutch centre.
3) Simply measure the depth of the hole through the pressure plate to the clutch centre. The measurement differs depending on the design of the clutch. Pic a) and Pic b)
4) Assemble the clutch with all the correct plates (check your clutch instructions!) springs and spring collars.
5) Now, simply recheck the depth of the holes. The plate pack should have lifted the pressure plate slightly and the depth of the holes should be slightly greater than before. Pic c)
6) Subtract the first measurement (Para 3 above) from the second (Para 5 above) and you will get the clearance between the centre and the pressure plate A new unworn clutch pack should give a measurement of 1 to 1.2mm (1.5 for big twins) more than before..
7) For general track and other non-competition use the clearance should be between 1.0 and 1.2mm (1.5 for big twins). Check that the clutch and the clutch pack is assembled correctly if the clearance is over 2.0mm with a standard clutch pack. If the clearance is much below 1.0mm your clutch pack is worn and you should consider new friction plates.
http://www.sigmaperformance.com
No. 47
2013-05-13 12:11:00 UTC
Post missing.
No. 47
2013-05-13 12:28:00 UTC
Mustn't forget to soak the new friction plates in oil for 24 hours as reminded by Spalders - had forgotten that tip learned from many years on old BSAs, Triumphs, Nortons and, very briefly, a Vincent (should've kept that one) - too many years on Ducati dry clutches, I guess.
No. 47
2013-05-15 12:30:00 UTC
Received clutch kit and now clear that thrust plate and Belleville spring sit inside larger id friction plate so o/a clutch pack depth unchanged with/without them - one question, Belleville spring is installed with concave surface outermost?
Superdan
2013-05-15 12:41:00 UTC
yes like this not sure if thrust washer/beville spring are the same but I know the part you mean:
After fitting Tony's he rang Spalders and said the clutch pack should not be aligned as per OEM and the SIGMA photos, but in a random order.
No. 47
2013-05-15 12:52:00 UTC
Ta - thrust washer/plate is flat in section profile and the Belleville spring curved in section profile (not curved overall across diameter) - I assume that your diagram is outside to lhs and engine/gearbox to rhs.
The Gin Reaper
2013-05-15 13:37:00 UTC
.... I see that our very own No47 made it on to Neil Spaldings of Eurosport and sigma slipper clutch fames twitter feed! ..... Good pic to but I can't find the link to it at the moment.... It looked like a very out of shape approach downhill into possibly Mansfield at cadwell?
https://mobile.twitter.com/Spalders/sta ... 5422088192 The Gin Reaper
2013-05-15 13:42:00 UTC
No. 47
2013-05-15 15:33:00 UTC
What is this thing called Twitter?


Tony the Tiger
2013-05-15 15:46:00 UTC
Post missing.
No. 47
2013-05-16 09:57:00 UTC
All done, all good - thanks for the input - will be replacing the GXSR springs and the OE with the race clutch plate set-up, though, and refitting the OE damper to see whether perceived additional slight vibration when clutch is disengaged is real or imagined.
No. 47
2013-05-16 22:30:00 UTC
Post missing.
No. 47
2013-05-24 19:39:00 UTC
Anyone?
No. 47
2014-04-26 10:28:00 UTC
Just about to replace friction plates again as clutch started slipping shortly after swopping over to new engine - turns out my Sigma had been fitted with two flat washers under the main shaft hub nut and not the dished compressible washer supplied by Sigma - emailed Neil Spalding and he personally delivered a new one to my door foc (unlike Dan, have always found him really willing and able to help) - also tells me that the dished washer should be installed with concave face outwards/convex face inwards, ie "pointy side pointing inwards".
Still unclear why the first set of plates lasted the race miles plus circa 50k road miles and the last two sets only 10k road miles each though....................
No. 47
2014-09-10 09:38:00 UTC
Post missing.
No. 47
2016-08-22 10:29:00 UTC
Another cheer for Neil Spalding at Sigma - replaced clutch friction plates over the weekend, due to clutch both dragging and slipping, and found new pressure plate had worn again exactly same as previous - texted Neil for advice and he came back immediately by texts and mobile phone calls despite the fact that he was in Brno covering the MotoGP (congrats to McPhie, Lowes and Crutchlow) - don't know many suppliers who would do that.......................looks like hub ball bearings/ramps have finally worn out at approaching 100k road miles plus race miles, ie not lifting pressure plate as far as it should be, so time for a complete new kit.
No. 47
2016-08-22 18:45:00 UTC
Post missing.


